DDAMFN 表情识别
本文使用 DDAMFN++ 快速部署表情识别模型,更多表情识别模型和代码参见 Papers with Code。
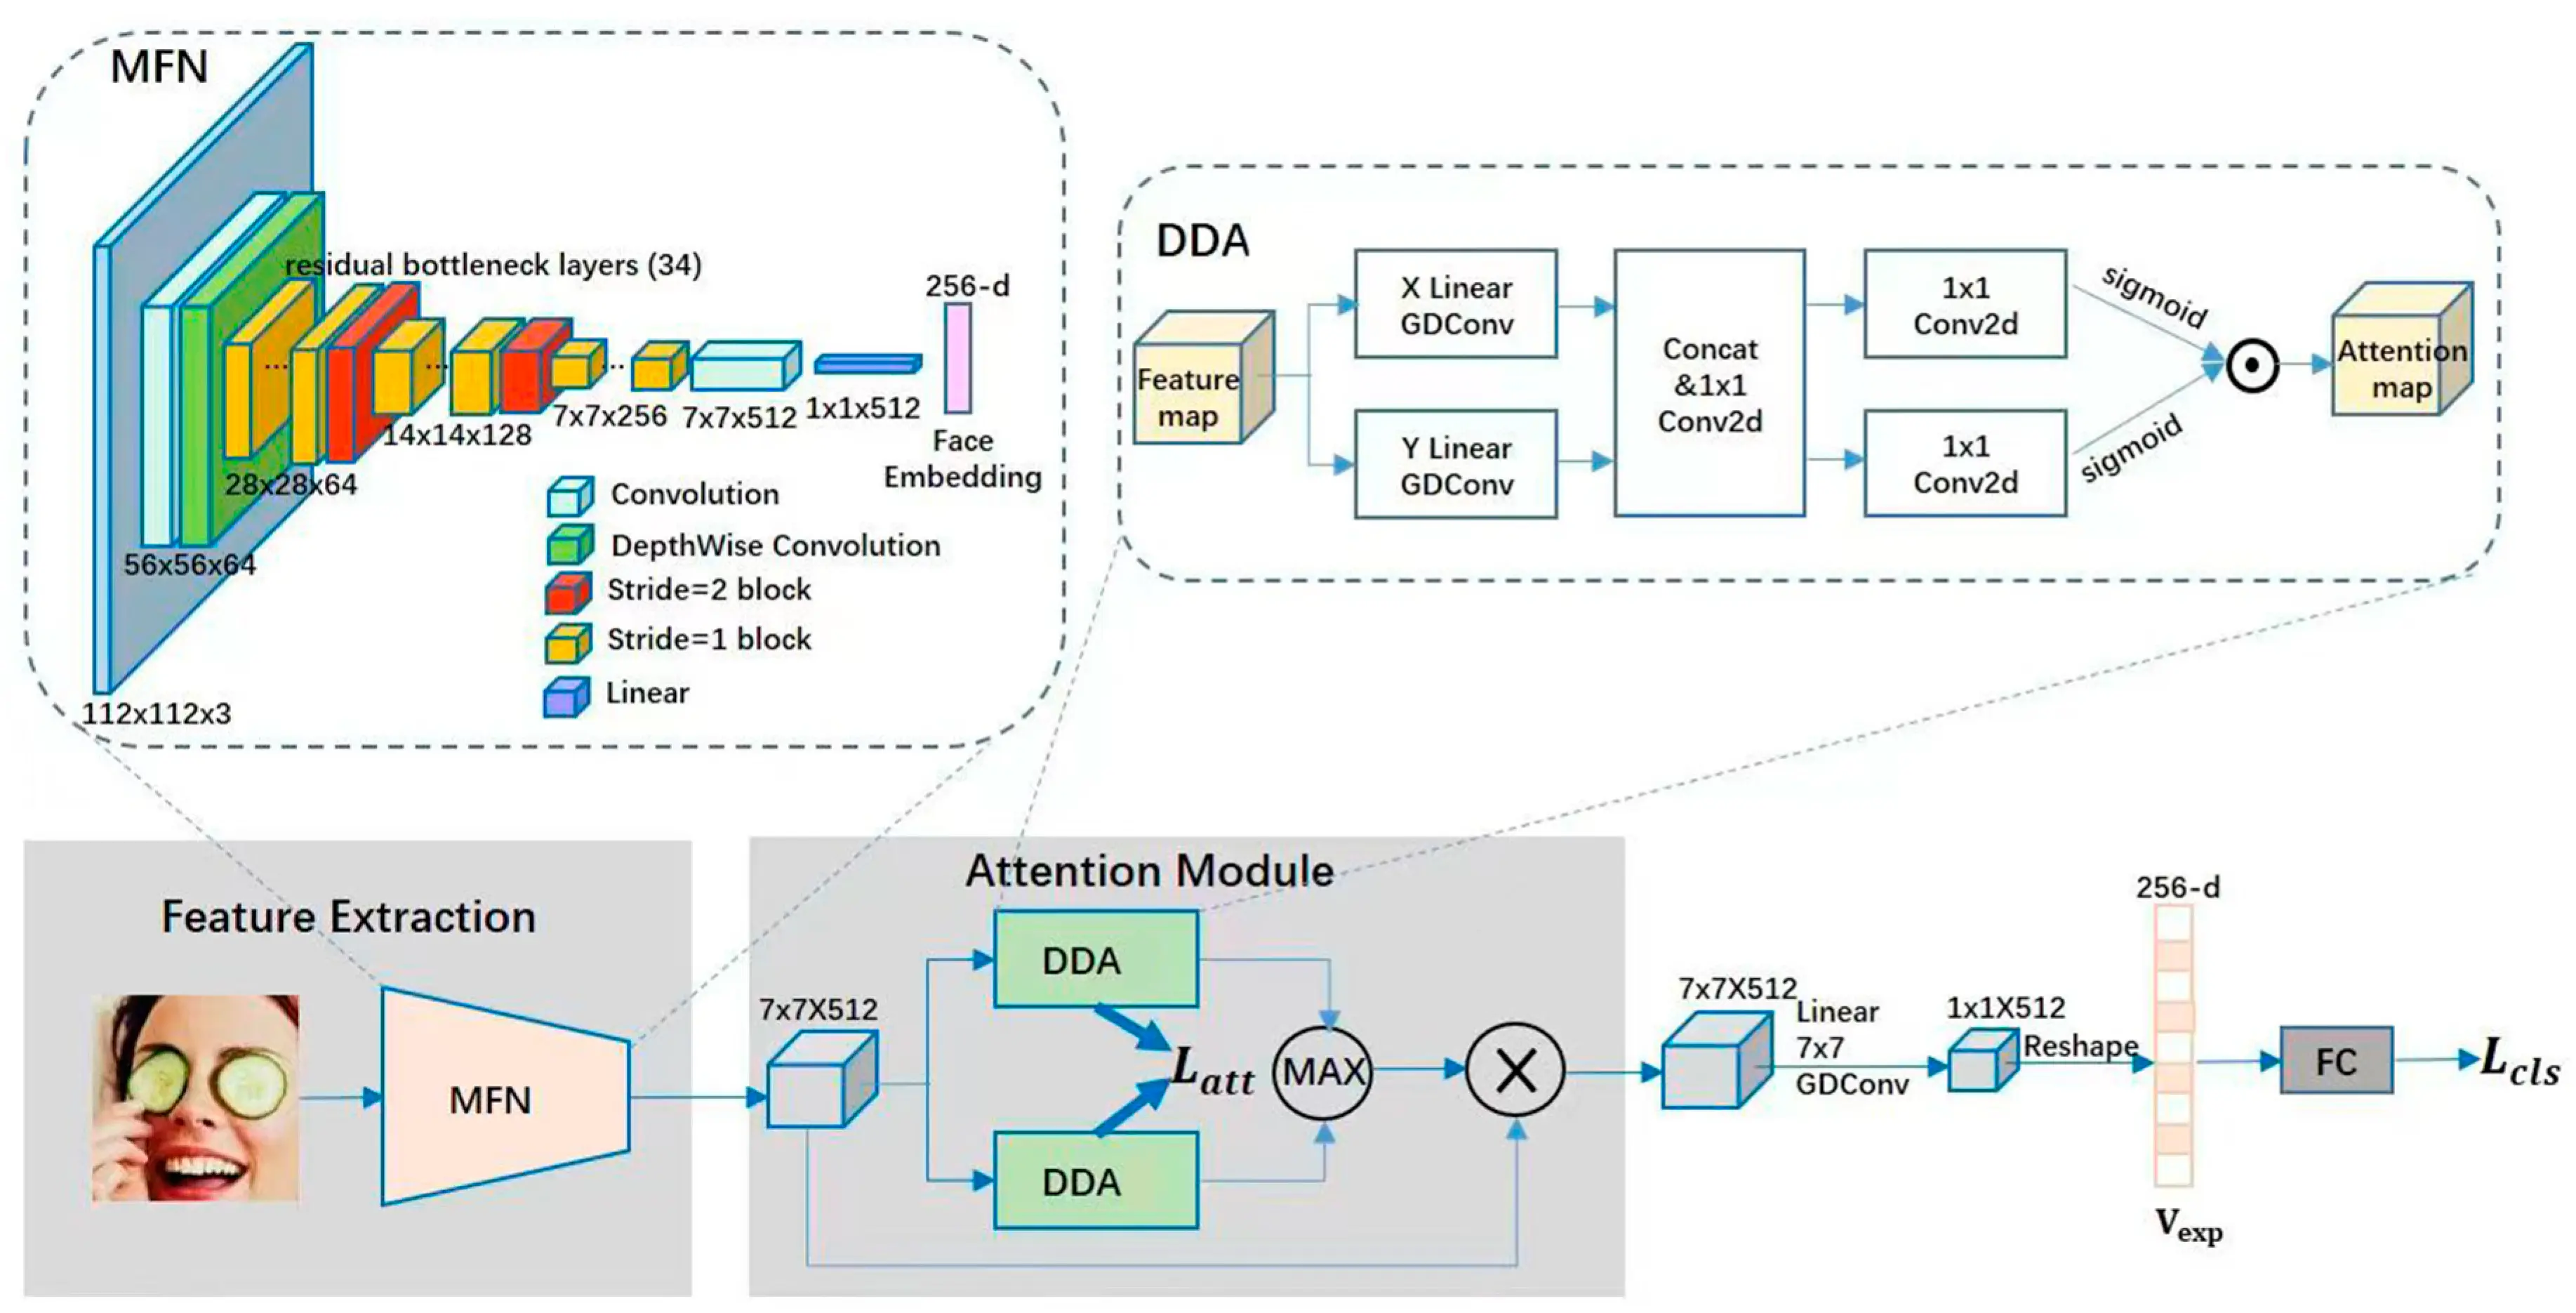
1. DDAMFN 介绍
- 模型论文:A Dual-Direction Attention Mixed Feature Network for Facial Expression Recognition
- 官方仓库:SainingZhang/DDAMFN
- 数据集:AffectNet
网络模型结构:
2. 模型转换
新建 DDAMFN++/onnx_export.py 文件,内容如下:
python
import argparse
import torch
from networks.DDAM import DDAMNet


def parse_args():
    parser = argparse.ArgumentParser()
    parser.add_argument("--batch_size", type=int, default=128, help="Batch size.")
    parser.add_argument(
        "--workers", default=8, type=int, help="Number of data loading workers."
    )
    parser.add_argument(
        "--num_head", type=int, default=2, help="Number of attention head."
    )
    parser.add_argument("--num_class", type=int, default=8, help="Number of class.")
    parser.add_argument(
        "--model_path", default="./checkpoints_ver2.0/affecnet8_epoch25_acc0.6469.pth"
    )
    parser.add_argument(
        "--output_path", default="./checkpoints_ver2.0/affecnet8_epoch25_acc0.6469.onnx"
    )
    return parser.parse_args()


def export_onnx():
    args = parse_args()
    device = torch.device("cuda:0" if torch.cuda.is_available() else "cpu")

    model = DDAMNet(num_class=args.num_class, num_head=args.num_head, pretrained=False)

    checkpoint = torch.load(args.model_path, map_location=device)
    model.load_state_dict(checkpoint["model_state_dict"])
    model.to(device)
    model.eval()

    # Define input example
    dummy_input = torch.randn(1, 3, 112, 112, device=device)

    # Perform inference to capture dynamic computation graph
    with torch.no_grad():
        output, _, _ = model(dummy_input)

    # Export the model to ONNX
    torch.onnx.export(
        model, dummy_input, args.output_path, verbose=True, opset_version=10
    )

    print(f"ONNX model exported to {args.output_path}")


if __name__ == "__main__":
    export_onnx()
新建预测代码 DDAMFN++/onnx_inference.py,内容如下:
python
import time

import cv2
import numpy as np
import onnxruntime
from PIL import Image
from torchvision import transforms


def inference(onnx_model_path: str, image_path: str):
    # Load ONNX model
    ort_session = onnxruntime.InferenceSession(onnx_model_path)
    time1 = time.time()
    # Preprocess input image
    image_transform = transforms.Compose(
        [
            transforms.Resize((112, 112)),
            transforms.ToTensor(),
            transforms.Normalize(mean=[0.485, 0.456, 0.406], std=[0.229, 0.224, 0.225]),
        ]
    )
    image = Image.open(image_path).convert("RGB")
    image_tensor = image_transform(image).unsqueeze(0).numpy()
    # Perform inference
    ort_inputs = {ort_session.get_inputs()[0].name: image_tensor}
    ort_outs = ort_session.run(None, ort_inputs)
    logits = np.squeeze(ort_outs[0])
    # Apply softmax
    probabilities = np.exp(logits) / np.sum(np.exp(logits), axis=0)
    time2 = time.time()
    print(f"Inference time: {time2 - time1} seconds")
    return probabilities


def predict_video(model_path: str):
    # Open video capture
    cap = cv2.VideoCapture(0)  # Use 0 for webcam or provide a video file path
    if not cap.isOpened():
        print("Error: Could not open video source.")
        return

    # Load ONNX model
    ort_session = onnxruntime.InferenceSession(model_path)

    image_transform = transforms.Compose(
        [
            transforms.Resize((112, 112)),
            transforms.ToTensor(),
            transforms.Normalize(mean=[0.485, 0.456, 0.406], std=[0.229, 0.224, 0.225]),
        ]
    )

    # Emotion labels
    emotion_labels = [
        "Neutral",
        "Happiness",
        "Sadness",
        "Surprise",
        "Fear",
        "Disgust",
        "Anger",
        "Contempt",
    ]

    while cap.isOpened():
        # Read frame
        ret, frame = cap.read()
        if not ret:
            break

        # Convert to PIL Image
        pil_image = Image.fromarray(cv2.cvtColor(frame, cv2.COLOR_BGR2RGB))

        # Preprocess
        image_tensor = image_transform(pil_image).unsqueeze(0).numpy()

        # Inference
        ort_inputs = {ort_session.get_inputs()[0].name: image_tensor}
        start_time = time.time()
        ort_outs = ort_session.run(None, ort_inputs)
        inference_time = time.time() - start_time

        # Process results
        logits = np.squeeze(ort_outs[0])
        probabilities = np.exp(logits) / np.sum(np.exp(logits), axis=0)
        predicted_class = np.argmax(probabilities)

        # Display results on frame
        cv2.putText(
            frame,
            f"Emotion: {emotion_labels[predicted_class]}",
            (10, 30),
            cv2.FONT_HERSHEY_SIMPLEX,
            0.8,
            (0, 255, 0),
            2,
        )
        cv2.putText(
            frame,
            f"Confidence: {probabilities[predicted_class]:.2f}",
            (10, 60),
            cv2.FONT_HERSHEY_SIMPLEX,
            0.8,
            (0, 255, 0),
            2,
        )
        cv2.putText(
            frame,
            f"Time: {inference_time*1000:.0f}ms",
            (10, 90),
            cv2.FONT_HERSHEY_SIMPLEX,
            0.8,
            (0, 255, 0),
            2,
        )

        # Display frame
        cv2.imshow("Emotion Recognition", frame)

        # Exit on ESC key
        if cv2.waitKey(1) == 27:  # 27 is ESC key
            break

    # Release resources
    cap.release()
    cv2.destroyAllWindows()


def test():
    res = inference(
        "./checkpoints_ver2.0/affecnet8_epoch25_acc0.6469.onnx", "./image0000033.jpg"
    )
    print(res)


if __name__ == "__main__":
    test()
3. 训练
克隆代码仓库:
bash
git clone https://github.com/SainingZhang/DDAMFN为了兼容新版本的 PyTorch,修改 networks/DDAM.py 和 DDAMFN++/networks/DDAM.py 的 27 行:
python
if pretrained:
    net = torch.load(os.path.join('./pretrained/', "MFN_msceleb.pth"), weights_only=False)
下面安装依赖,可使用 pip 或 conda 安装,除了 PyTorch 外,还需要安装以下依赖:
bash
pip install matplotlib onnx onnxruntime-gpu pandas scikit-learn tqdm(可选)如果使用 uv,可使用 pyproject.toml 定义依赖:
toml
[project]
name = "ddamfn"
version = "0.1.0"
description = "Add your description here"
readme = "README.md"
requires-python = ">=3.11"
dependencies = [
    "matplotlib>=3.10.1",
    "onnx>=1.17.0",
    "onnxruntime-gpu>=1.20.1",
    "pandas>=2.2.3",
    "scikit-learn>=1.6.1",
    "torch==2.6.0+cu126",
    "torchaudio==2.6.0+cu126",
    "torchvision==0.21.0+cu126",
    "tqdm>=4.67.1",
]

[tool.uv]
index-strategy = "unsafe-best-match"
index-url = "https://pypi.org/simple"
extra-index-url = [
    "https://pypi.org/simple",
    "https://download.pytorch.org/whl/cu126",
]
假设已经下载并解压好 AffectNet 数据集到 F:/Datasets/AffectNet 目录下,可使用如下训练命令:
bash
cd "DDAMFN++"
python affectnet_train_sam_opt_v2.0.py --aff_path F:/Datasets/AffectNet --num_class 8 --batch_size 64